Ricoh 35 EFS: Difference between revisions
(Basic notes) |
(Added 1 photo) |
||
| Line 10: | Line 10: | ||
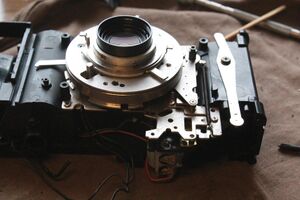
The front lens just screws onto the front of the rotating group 2 set, which has the helicoid thread inside the bottom of it. The last lens group sits inside a collar which has the other side of the helicoid on its outside. This collar is threaded at the base to screw into the base plate - this part holds the shutter assembly in place. When turning the focus ring, a flanged ring turns via a protruding lever. The lever and ring are attached to the lens group 2 with three setscrews (under pliable glue). When that group turns, some other attached rings are moved around (turning but also sliding back and forth in a slot in the plastic cover - the sliding motion controls the maximum aperture). | The front lens just screws onto the front of the rotating group 2 set, which has the helicoid thread inside the bottom of it. The last lens group sits inside a collar which has the other side of the helicoid on its outside. This collar is threaded at the base to screw into the base plate - this part holds the shutter assembly in place. When turning the focus ring, a flanged ring turns via a protruding lever. The lever and ring are attached to the lens group 2 with three setscrews (under pliable glue). When that group turns, some other attached rings are moved around (turning but also sliding back and forth in a slot in the plastic cover - the sliding motion controls the maximum aperture). | ||
[[File:Ricoh35EFS front assy.jpg.jpg|none|thumb|Front assembly with focus helicoid, meter, shutter, aperture]] | |||
* [https://butkus.org/chinon/ricoh/ricoh_35_efs/ricoh_35_efs.htm Butkus manual location] | * [https://butkus.org/chinon/ricoh/ricoh_35_efs/ricoh_35_efs.htm Butkus manual location] | ||
Revision as of 13:30, 8 April 2025
Ricoh 35 EF (silver) didn't have a self-timer and the EFS (black) did.
This is a pretty straightforward camera internally.
Camera has one left-hand-threaded screw, this is located in the charge mechanism in the base of the camera. This screw is a large-headed flathead screw which holds down two small anti-rotation burrs that move in a pleasant-to-watch alternating motion on the large wind gear they engage with. Watch out for a small washer on this screw, it's installed at the thread end of the stack, to keep the shoulder of the screw, which is a little bit too small, from getting too close to the plate. The hole in the washer is just big enough for the thread.
Internal springs appear to be gold-plated bronze and are susceptible to corrosion.
After removing the selenium cell and lens rings, the front cover comes off as a single piece. Then, the baseplate, meter assembly, shutter, aperture, and lenses are detachable from the body as a single group via 4 retaining screws.
The front lens just screws onto the front of the rotating group 2 set, which has the helicoid thread inside the bottom of it. The last lens group sits inside a collar which has the other side of the helicoid on its outside. This collar is threaded at the base to screw into the base plate - this part holds the shutter assembly in place. When turning the focus ring, a flanged ring turns via a protruding lever. The lever and ring are attached to the lens group 2 with three setscrews (under pliable glue). When that group turns, some other attached rings are moved around (turning but also sliding back and forth in a slot in the plastic cover - the sliding motion controls the maximum aperture).

