Ricoh 35 EFS: Difference between revisions
mNo edit summary |
mNo edit summary |
||
| Line 1: | Line 1: | ||
=== Observations === | |||
Ricoh 35 EF (silver) didn't have a self-timer and the EFS (black) did. | Ricoh 35 EF (silver) didn't have a self-timer and the EFS (black) did. | ||
| Line 7: | Line 8: | ||
Internal springs appear to be gold-plated bronze and are susceptible to corrosion. Battery terminals might be zinc-plated steel and don't solder well - probably because the zinc dissolved in battery acid. Terminals have projections where 0.1mm zinc strip can be spot-welded over the top, then soldered. | Internal springs appear to be gold-plated bronze and are susceptible to corrosion. Battery terminals might be zinc-plated steel and don't solder well - probably because the zinc dissolved in battery acid. Terminals have projections where 0.1mm zinc strip can be spot-welded over the top, then soldered. | ||
After removing the selenium cell and lens rings, the front cover comes off as a single piece. Then, the baseplate, meter assembly, shutter, aperture, and lenses are | After removing the selenium cell and lens rings, the front cover comes off as a single piece. Then, the baseplate, meter assembly, shutter, aperture, and lenses are demountable from the body as one assembly via 4 retaining screws. | ||
The front lens just screws onto the front of the rotating group 2 set, which has the helicoid thread inside the bottom of it. The last lens group sits inside a collar which has the other side of the helicoid on its outside. This collar is threaded at the base to screw into the base plate - this part holds the shutter assembly in place. When turning the focus ring, a flanged ring turns via a protruding lever. The lever and ring are attached to the lens group 2 with three setscrews (under pliable glue). When that group turns, some other attached rings are moved around (turning but also sliding back and forth in a slot in the plastic cover - the sliding motion controls the maximum aperture). | The front lens just screws onto the front of the rotating group 2 set, which has the helicoid thread inside the bottom of it. The last lens group sits inside a collar which has the other side of the helicoid on its outside. This collar is threaded at the base to screw into the base plate - this part holds the shutter assembly in place. When turning the focus ring, a flanged ring turns via a protruding lever. The lever and ring are attached to the lens group 2 with three setscrews (under pliable glue). When that group turns, some other attached rings are moved around (turning but also sliding back and forth in a slot in the plastic cover - the sliding motion controls the maximum aperture). | ||
| Line 14: | Line 15: | ||
=== Shutter === | === Shutter === | ||
The shutter is tricky to assemble once taken apart, due to a spring that easily slips off a lever that isn't secured in position until it's all closed up. I think a better approach for next time may be to attach the spring with some loops of cotton or something that can be taken off afterwards. You can still access the innards of the shutter through the sides after it's put together. (TODO: pictures) | |||
The | === Flash === | ||
The flash capacitor used is a Rubycon "Photo Flash" 180uF 330v electrolytic. | |||
---- | |||
* [https://butkus.org/chinon/ricoh/ricoh_35_efs/ricoh_35_efs.htm Butkus user manual location] | * [https://butkus.org/chinon/ricoh/ricoh_35_efs/ricoh_35_efs.htm Butkus user manual location] | ||
* There is no service manual available that I could find. | * There is no service manual available that I could find. | ||
Latest revision as of 00:18, 17 April 2025
Observations
Ricoh 35 EF (silver) didn't have a self-timer and the EFS (black) did.
This is a pretty straightforward camera internally.
Camera has one left-hand-threaded screw, this is located in the charge mechanism in the base of the camera. This screw is a large-headed flathead screw which holds down two small anti-rotation burrs that move in a pleasant-to-watch alternating motion on the large wind gear they engage with. Watch out for a small washer on this screw, it's installed at the thread end of the stack, to keep the shoulder of the screw, which is a little bit too small, from getting too close to the plate. The hole in the washer is just big enough for the thread.
Internal springs appear to be gold-plated bronze and are susceptible to corrosion. Battery terminals might be zinc-plated steel and don't solder well - probably because the zinc dissolved in battery acid. Terminals have projections where 0.1mm zinc strip can be spot-welded over the top, then soldered.
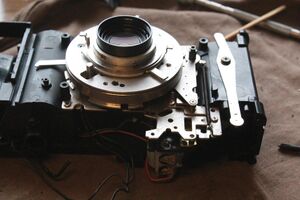
After removing the selenium cell and lens rings, the front cover comes off as a single piece. Then, the baseplate, meter assembly, shutter, aperture, and lenses are demountable from the body as one assembly via 4 retaining screws.
The front lens just screws onto the front of the rotating group 2 set, which has the helicoid thread inside the bottom of it. The last lens group sits inside a collar which has the other side of the helicoid on its outside. This collar is threaded at the base to screw into the base plate - this part holds the shutter assembly in place. When turning the focus ring, a flanged ring turns via a protruding lever. The lever and ring are attached to the lens group 2 with three setscrews (under pliable glue). When that group turns, some other attached rings are moved around (turning but also sliding back and forth in a slot in the plastic cover - the sliding motion controls the maximum aperture).

Shutter
The shutter is tricky to assemble once taken apart, due to a spring that easily slips off a lever that isn't secured in position until it's all closed up. I think a better approach for next time may be to attach the spring with some loops of cotton or something that can be taken off afterwards. You can still access the innards of the shutter through the sides after it's put together. (TODO: pictures)
Flash
The flash capacitor used is a Rubycon "Photo Flash" 180uF 330v electrolytic.
- Butkus user manual location
- There is no service manual available that I could find.
